
Standard booking
Manage your service data in Meety
8 November, 2022Subscription booking in Meety
8 November, 2022Standard booking
Meety’s Standard Booking feature allows your customers to book hour-based or day-based slots.
The app automatically adds a “Schedule Your Time Now” button to your product page, making it easy for customers to select their preferred time slot.
Some examples of how this can be applied:
- A customer books a tarot reading appointment from 9:00 AM to 10:00 AM on Tuesday, August 14
- A customer reserves a car rental service for 3 days from August 12 to 15
Here’s a closer look at how Standard Booking works:
1. How to create a Standard Booking?
To create a Standard booking:
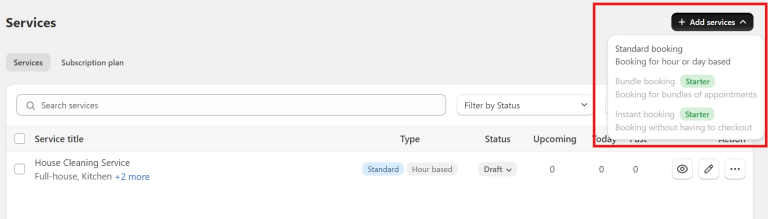
Go to Service tab > click Add services > select Standard booking
2. How to set up Standard Booking – General?
2.1. General
After going to the General page, you’ll find several sections to configure. Let’s walk through each one of them:
2.1.1 Booking type
There are two ways you can set up your service as standard booking:
- Hour-based booking: Allow customers to book within certain hours/time of the day.
- Day-based booking: Allow customers to book for a range of days.

2.1.2. Time & Capacity set up
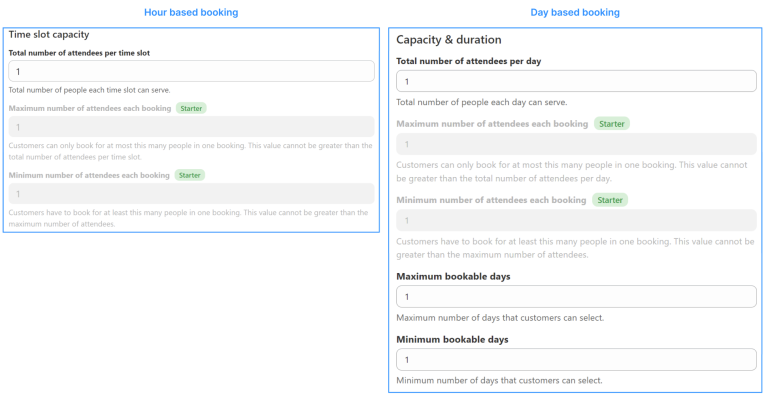
With Hour based booking, you will be able to set specific conditions, including:
- Total number of attendees per time slot: Set up the number of people you can serve in each time slot
- Maximum/ minimum number of attendees each booking: Customers can only book for at most/ at least this many people in one booking. This feature is only available in the Starter plan.
- Optimize slot capacity: Open new slot only when the booked quantity on the previous one is not less than.
- Limit number of bookings each slot or day: Limit the maximum number of bookings per slot or day. Once the limit is reached, customers can no longer book, even if capacity is still available.
With Day based booking, you will be able to set specific conditions, including:
- Total number of attendees per day: Set up the number of people each day can serve.
- Maximum/ minimum number of attendees each booking: Customers can only book for at most/ at least this many people in one booking. This feature is only available in the Starter plan.
- Maximum/ minimum bookable days: Customers can select to book at most/ at least this number of days.
- Limit number of bookings each slot or day: Limit the maximum number of bookings per slot or day. Once the limit is reached, customers can no longer book, even if capacity is still available.
2.1.3. Multiple booking
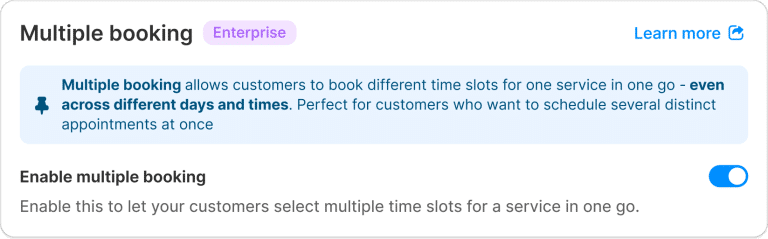
Multiple booking allows customers to book different time slots for one service in one go – even across different days and times. Perfect for customers who want to schedule several distinct appointments at once
a. Enabling Multiple booking feature
Go to Services tab > click Manage service button > General > Multiple booking section > turn on Enable multiple booking.
b. How do customers book multiple slots?

- Select a Date
At the widget, the customer first selects a preferred date.
- Choose Multiple Time Slots
They can click on any available time slot to select it. To select multiple slots, simply click on each one.
To deselect, click the same time slot again.
- Continue selecting from other dates (optional)
Customers can switch to another date if they want to keep selecting more time slots.
All previously selected slots will be automatically saved, and a colored dot will appear under dates with selected time slots to help keep track.
- Preview or Proceed to Confirm Booking page
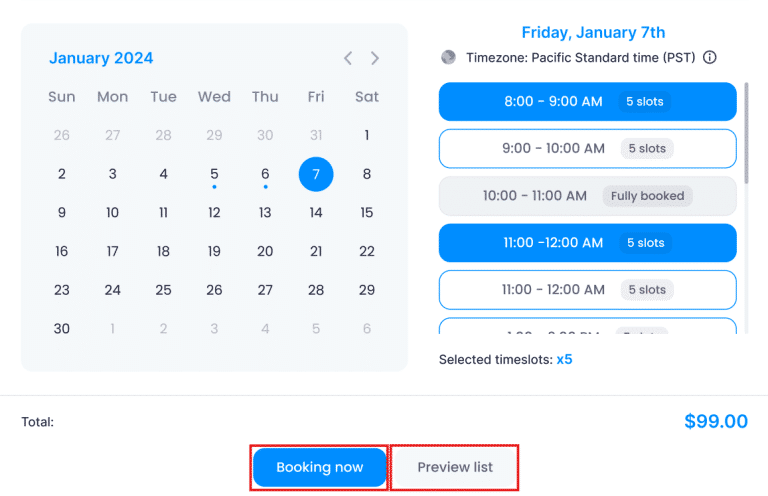
After selecting all desired slots, customers can:
- Click Preview to review and manage selected slots:

– View a list of all selected time slots, including date and time.
– Use the trash icon to delete any unwanted slot.
– Click Back to return and add more time slots if needed.
Or click Booking Now to proceed directly to the Confirm Booking page.
Day based booking:

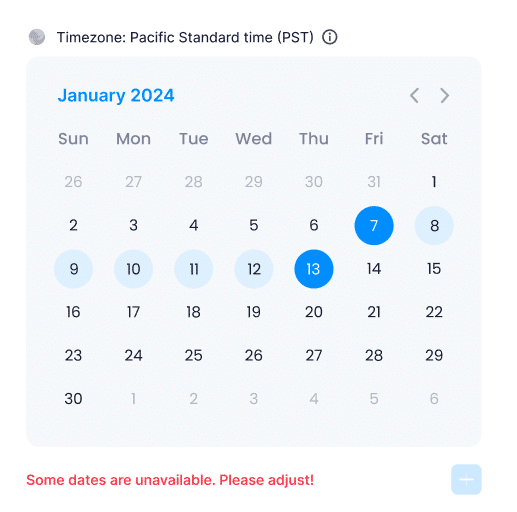
1. Select Start and End Dates
At the widget, the customer selects a start date and an end date.
To change the selection, simply click again to choose a new date range.
2. Add to Booking Review Panel
After selecting a valid date range, click the Add (+) icon to add the selection to the Booking Review panel.
If some dates within the selected range are unavailable, the Add (+) icon will be disabled, and a message will appear to prompt the customer to adjust the selection.
3. Manage Bookings in the Review Panel
In the Booking Review panel, customers can:
- View the list of selected date ranges.
- Use the trash icon to remove any unwanted slot.
4. Proceed to Confirm Booking
After finalizing selections, click the Booking Now button to continue to the Confirm Booking page.
c. How to manage multiple bookings (Admin panel)
Multiple bookings are managed in the Bookings tab, just like single bookings.
Go to Meety > Bookings > Manage Booking to view all booking orders.
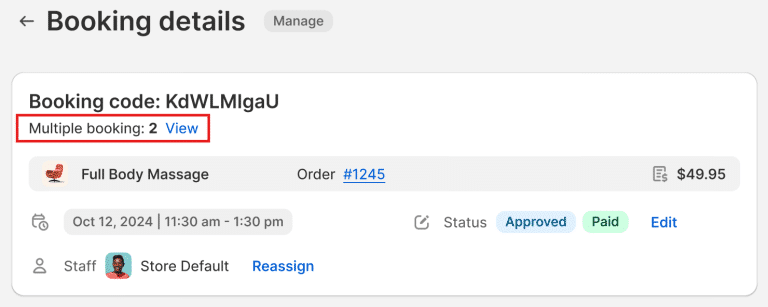
In the Booking details, any booking that belongs to a multiple booking order will be marked with a Multiple Booking tag.
You can click View to access a detailed overview of all bookings in the multiple booking order, including date, time, assigned staff, and status.

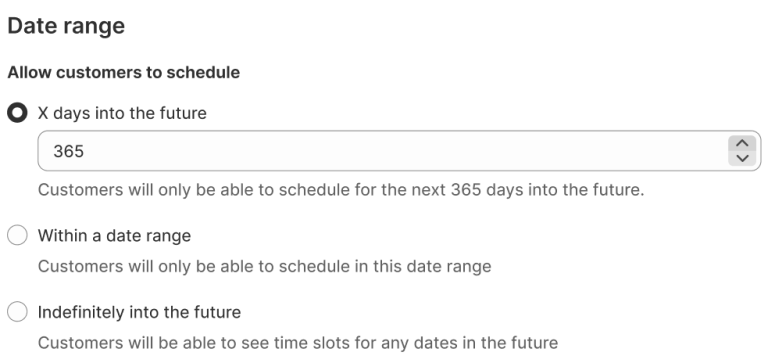
2.1.4. Date range
Set up the date range for customers to schedule booking into the future (X days into the future, within a date range, or indefinitely)
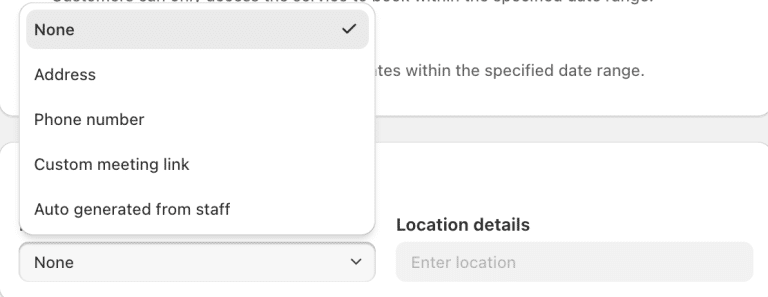
2.1.5. Joining details
- Add address, phone, meeting links, auto generate form staff, etc.
- For auto-generated Zoom links, see the detailed instructions here
2.2. How to set up Standard Booking – Availability?
2.2.1. Service time zone
Meety’s Service Timezone feature allows you to set different time zones for each service, giving you greater flexibility in managing bookings across various regions. This ensures accurate scheduling for both customers and staff.
Some examples of how this can be applied:
- Tour Services: Set different time zones for tours operating in various locations around the world
- Global Services: Manage services located in different countries, ensuring each service follows the correct local time
Join the Meety Premium plan today to try this powerful feature.
Here’s a closer look at how Service Timezone works:
a. How to set up a Service Timezone?
To enable the Service Timezone feature:
- Go to Settings tab > General > Store Date and Time section > Turn on the option Separate Timezone for Each Service

Once enabled, a Service Timezone section will appear in the Availability tab of the service, allowing you to adjust the timezone for each service individually.
To set up the timezone for each service:
- Go to Service tab > Availability > Service Timezone section > Choose the desired timezone for each service
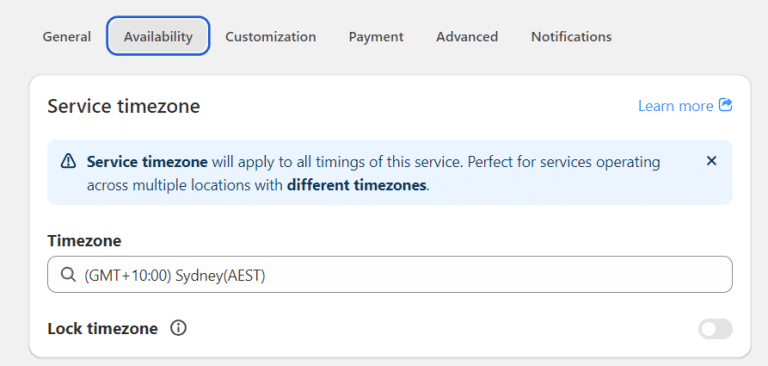
b. How to Lock Timezone Features with Service Timezone
- In the Service tab, you can choose to enable Lock Timezone
- When this option is turned on, customers will automatically see all time slots in the service’s timezone, and they will not be able to change it
Note: The Lock Timezone option will no longer appear in Settings tab > General once this feature is enabled for each service. To lock a timezone, you must adjust it within each service’s settings.
c. How to set up a Staff Timezone?
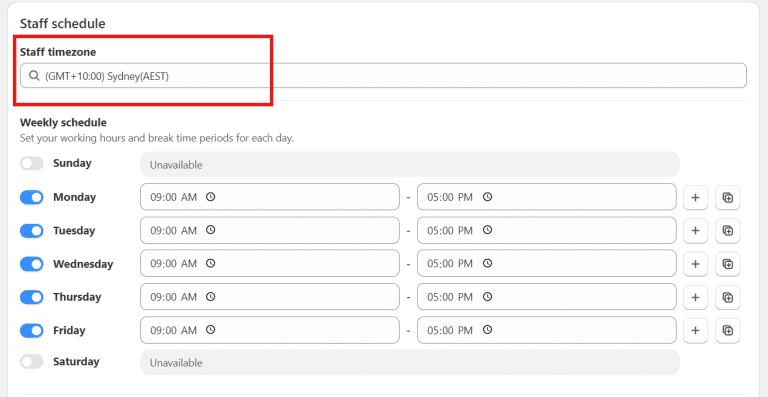
When using Service Timezone, you can also set up Staff Timezone with each staff a different timezone:
- Go to Staff tab > click Edit staff > Staff Schedule section > Choose timezone for your staff
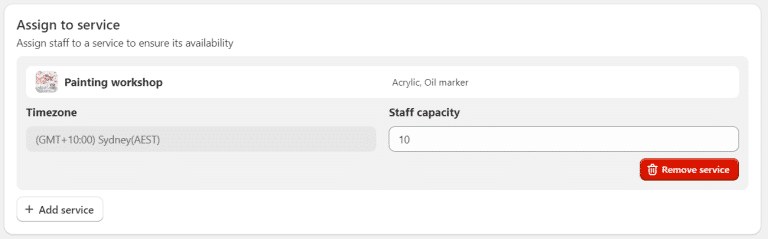
In the Assign to service section, you can manage which services are assigned to staff, along with their corresponding time zones and capacities
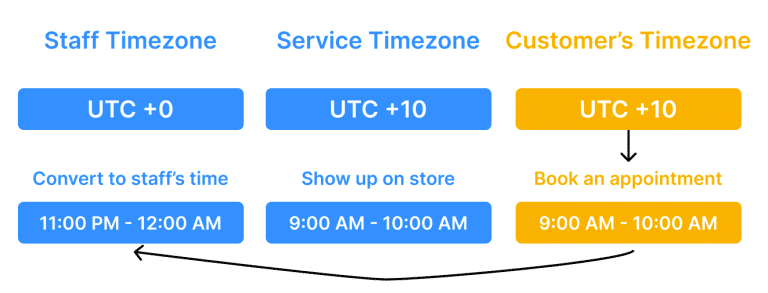
Note: The staff timezone and service timezone can differ. The system will automatically convert between these time zones to ensure accurate time slot displays on your store.
Example:
- Staff Timezone: UTC+0
- Service Timezone: UTC+10
- A customer in UTC+10 books a meeting from 9:00 AM to 10:00 AM
- The system will adjust and display the meeting for the staff as 11:00 PM to 12:00 AM (UTC+0)
d. How do Service Timezone settings affect your setup?
Here are some cases you should take in consideration when turn on Service Timezone:
Only Service Timezone is enabled:
- The Lock Timezone option will be hidden in Settings > General.
Only Business Hours is enabled:
- All staff and service time zones will align with the store’s timezone
- Staff weekly schedules, including overrides, will adjust to match the store’s timezone
Both Business Hours and Service Timezone are enabled:
- The Lock Timezone option will reappear in Settings > General
- Enabling Lock Timezone will display all service time zones according to the store’s timezone
- Disabling Lock Timezone will maintain individual service time zones
Date Overrides:
- Without Service Timezone, date overrides follow the store’s timezone
- With Service Timezone, date overrides follow the staff’s timezone
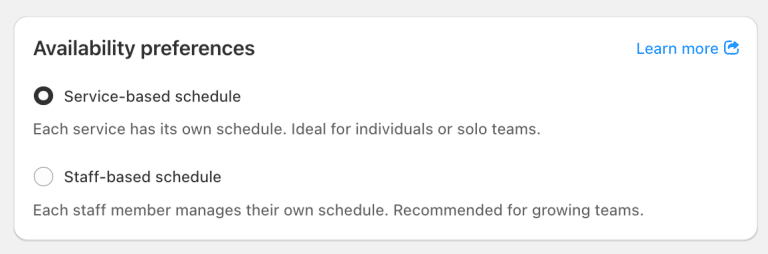
2.2.2. Availability preferences
Meety offers two distinct ways to manage your service availability: Service-based schedule and Staff-based schedule. Understanding the difference between these two is key to setting up your booking system effectively.
If you want to set up Availability Preferences, go to the Service tab > click Edit service > Availability > find Availability preferences.
Join the Meety Premium plan today to try this powerful feature.
Let’s explore each in detail:
a. Service-based schedule
With a Service-based schedule, each service has its own independent timetable. This means the availability shown to customers is directly linked to each individual service you offer.
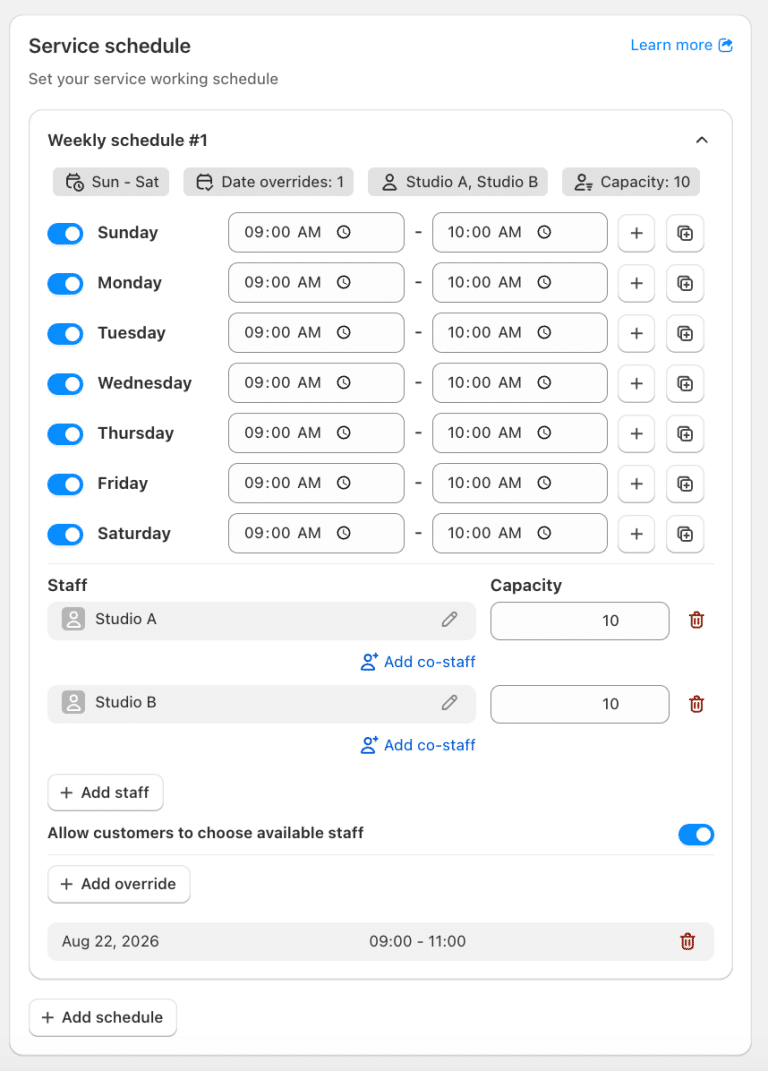
How it work:
- You can assign multiple staff members to the same service.
- Service schedules override individual staff availability — staff can only be booked within the service’s available time slots, regardless of their individual availability.
- A staff member’s time is only blocked for services when bookings are made for those services and they have reached their maximum capacity.
Example:
If a staff member is available for both Service A and Service B, they can be booked for both services at the same time, as long as the number of customers they can handle (capacity) isn’t exceeded for each service.
Recommended for:
- Individuals or solo teams offering multiple services with shared staff.
- Businesses that want to maximize staff availability.
b. Staff-based schedule
With a Staff-based Schedule, each staff member manages their own working hours and availability. The system then uses this individual availability to determine the open slots for the services they are assigned to.
How it work:
- Each staff member sets their own working hours.
- When a customer books a service, the system checks if the assigned staff member is available for that time slot.
- If a staff member is booked for one service, they are generally not available for other services during the same time.
Example:
Once a staff member is assigned to Service A during a time block, that slot becomes unavailable for Service B — even if there are no bookings for Service A. This prevents overbooking, but it may reduce efficiency in managing staff.
Recommended for:
Growing teams where staff specialize in specific services
Businesses that want customers to book directly with specific staff members.
Situations where staff have distinct and non-overlapping schedules.
c. Manage your Staff tab
Meety’s Staff tab lets you easily add, manage, and assign staff members, including co-staff, to ensure smooth operations and scheduling.
This feature allows you to efficiently manage staff availability and assignments for your services, providing a better booking experience for both your team and your customers.
Some examples of how this can be applied:
- Spa Services: Assign different staff members to specific services, such as massage, facials, or nails, and customize their schedules
- Event Management: For larger events, assign co-staff to assist the main staff member, ensuring seamless service delivery
- Fitness Classes: Manage instructors for different classes with personalized schedules, ensuring smooth coordination
- Here’s a closer look at how to manage your staff:
ci. How to Add new staff & Assign staff to your service?
To add new staff:
- Go to Staff tab > click Add new staff button
- Fill in the staff member’s personal information, assign them to services, set up their weekly schedule (learn more here), and add any date overrides if needed
- Click Save
You can also assign staff to services directly from the Service tab:
- Go to Service tab > click Edit service button > Availability > find Staff section > click Add staff button
For services that require co-staff:
- Click Add Co-Staff to assign an assistant to the main staff member. This feature is only available in the Business plan
- Co-staff capacity is linked to the main staff, meaning it won’t increase total service capacity

cii. How to edit and manage your staff?
To manage & edit your staff details:
- Go to Staff tab > All of your staff will be shown as below:

- Action button: you can Edit, Duplicate, Delete each staff member
- Connect Calendar: you can also Connect Calendar for each staff member. See detailed instructions here
2.2.3. Time slot settings
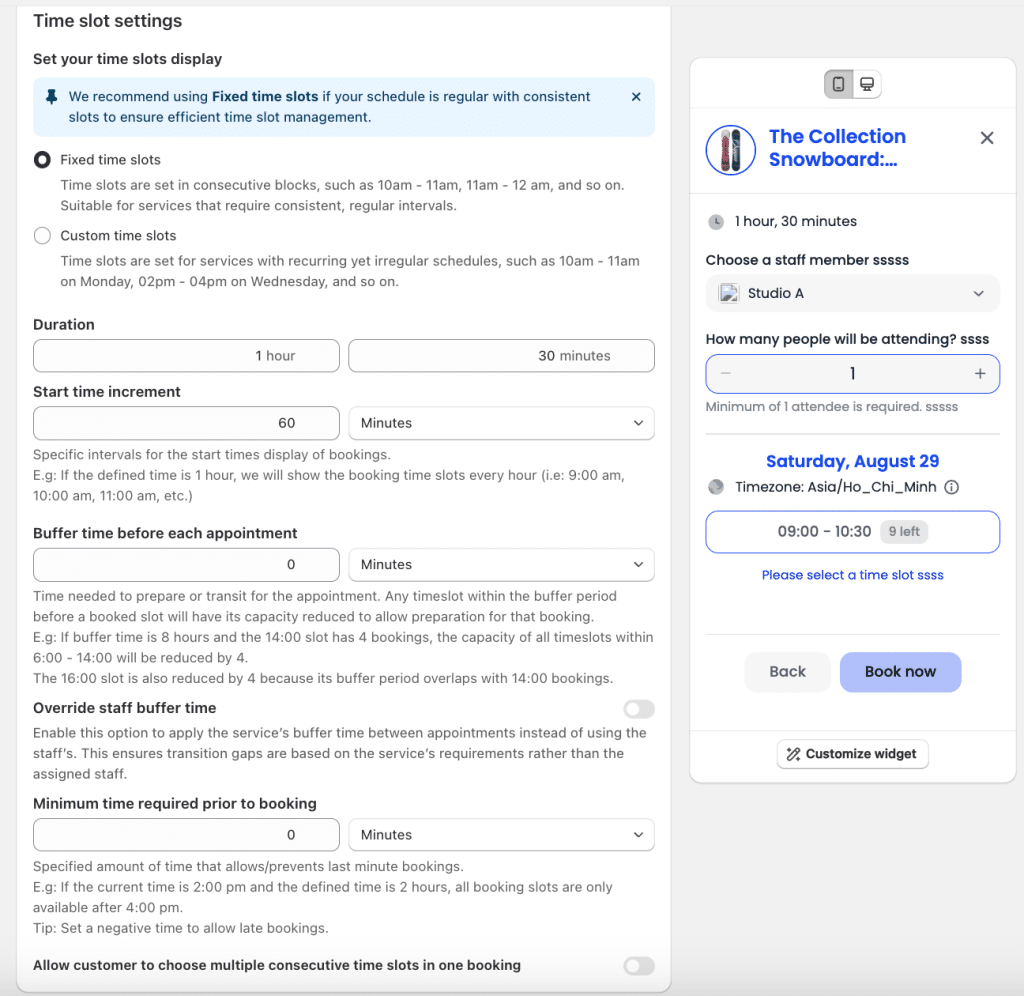
You can set up your time slots as either Fixed or Custom.
Fixed time slots are ideal for services with a regular schedule, consecutive sessions, and the same duration.
Custom time slots work better for services with recurring but irregular schedules.
For detailed instructions, watch this video or continue reading the tutorial:
With Fixed time slots, you will be able to set specific conditions, including:
- Duration: Set up duration for each time slot
- Start time increment: A specific interval for the start time display of time slots. For example: If the defined time is 30 minutes, the time slots will display every 30 minutes (i.e: 9:00 am, 9:30 am, 10:00 am, etc.)
- Buffer time before each appointment: Set up the time needed to prepare or transit for the appointment
- Override staff buffer time: Apply the service’s buffer time between appointments instead of using the staff’s.
- Minimum time requirement before booking: A specified amount of time that prevents last-minute bookings
- Allow customer to choose multiple consecutive time slots in one booking
With Custom time slots, you will be able to set specific conditions, including:
- Set specific time slots for your service
- Set a minimum time required before booking: This option allows customers to book only if they do it in advance, helping to prevent last-minute bookings
For example: You are running a workshop that only opens at 9am every Monday and 10am every Wednesday and you want to have at least 3 hours for preparation prior to the booking, you can set the conditions as below:

2.3. Customization
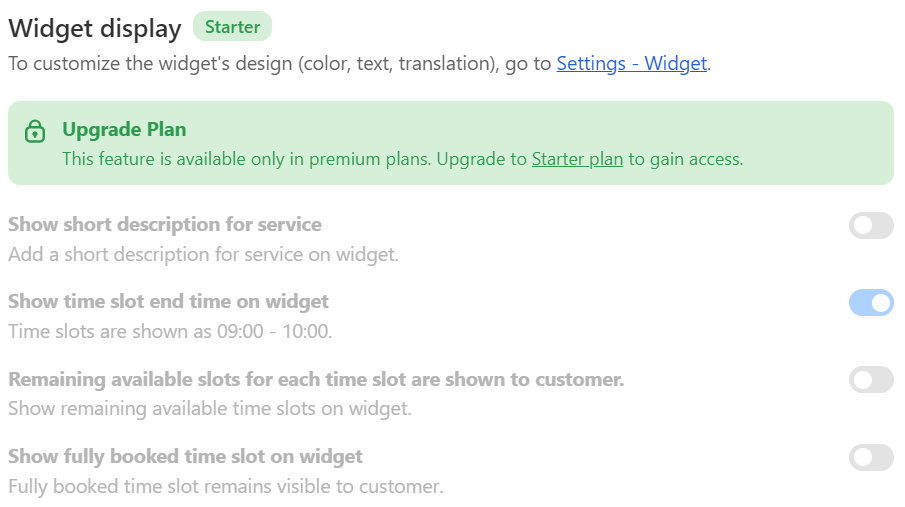
2.3.1. Widget display
- Set up a short description for service and how you want the time slot to display here. This feature is available in the Starter plan
- If you want to customize the widget’s design (color, text, translation), go to Product page widget in Setting tab
2.3.2. Custom question field
- Set up customized questions to collect additional details. This feature is available in the Starter plan
Additional questions can be created for customers to answer in your widget before checkout.
From the Services, click the Manage button > Create custom field, and you can see a pop-up of the question field section.

There are several question type options:
- Text field – Customers can enter freeform text such as names, notes, etc.
- Dropdown – Provides a predefined dropdown menu for customers to select one choice.
- Radio buttons – Customers select one option by clicking a radio button.
- Checkboxes – Customers can select multiple options by checking boxes.
- Email – Customers enter an email address that is validated for proper format.
- Phone – Customers enter a phone number that can be validated for the correct format.
- Date – Customers select a date from a popup calendar.
- Time – Customers select a time from a popup time picker.
- This field is required’ check box: Tick the check box if you want the customers to provide an answer.

Click Create field to finish building the custom question.
To edit a custom question later, click the pen icon next to the service and select Custom Fields. Click the Edit icon next to the question to modify it.
To delete a custom question, click the trash icon next to the question in Custom Fields.

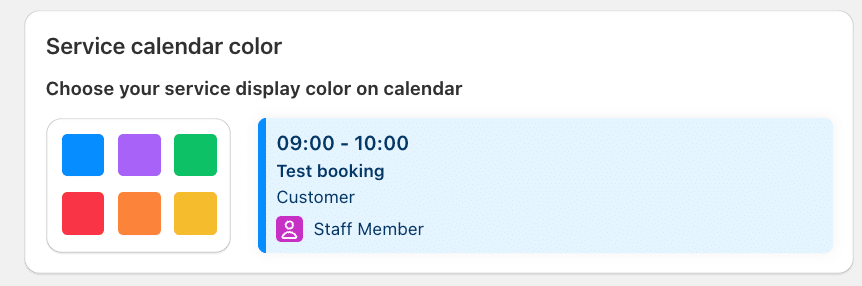
2.3.3. Service calendar color
- Set up the color of this service display in the Calendar tab in the Meety app
2.4. Payment/Pricing
2.4.1. No-payment booking
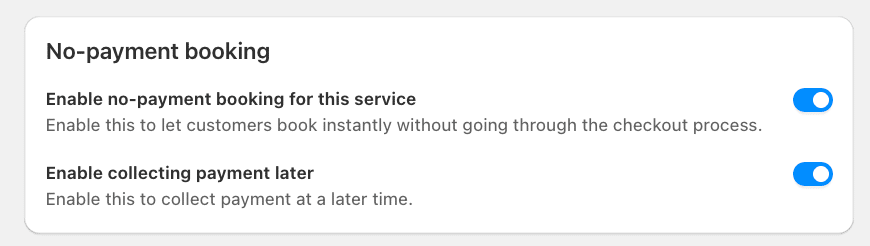
Meety’s No-payment Booking feature (formerly known as Instant Booking) allows your customers to book services without going through the checkout process. This feature is available for both standard and bundle bookings, offering flexibility and convenience to your customers while simplifying the booking process.
This feature ensures a seamless experience for customers who don’t require payment at the time of booking.
This feature is available on the Starter pricing plan.
Here’s a closer look at how No-payment booking works:
a. How to set up No-payment booking
To set up the No-payment booking:
- Go to Service tab > click Edit service button > Payment/Pricing tab > No-payment booking section > turn on Enable no-payment booking for this service
Note: Enabling No-payment Booking will automatically disable the Auto-refund and Deposit features for that service
Enable collecting payment later: After making a no-payment booking, the send invoice button will be shown on the Booking list to collect payment at a later time.

b. What does a No-payment booking look like for Customers?
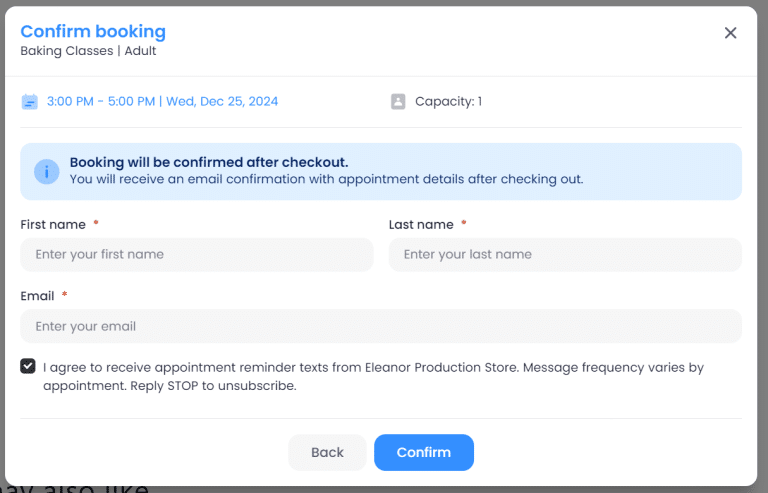
When you enable No-payment Booking for a service, customers will:
View, select services and choose time/day slot as usual
In the confirm booking window, customer will need to fill in their details (name, email) to finalize the booking
Confirm their booking without being directed to the checkout process
Once completed, the booking will appear on your Meety dashboard for tracking
Note: No-payment bookings are only recorded in Meety and will not be reflected in your Shopify Orders
2.4.2. Auto – refund
Meety’s Auto-refund feature allows you to automatically issue refunds when a booking is cancelled, saving time and reducing manual work.
This ensures a smoother customer experience by handling refunds seamlessly.
Here’s a closer look at how Auto-refund works:
a. How does Auto-refund work?
When Auto-refund is enabled, Meety will automatically process refunds when a booking is cancelled.
Note: The refund process depends on the customer’s payment method, and may not proceed if there are issues with the payment method.
b. How to set up Auto-refund?
To set up the Auto-refund:
- Go to Services tab > click Manage service button > Payment/Pricing tab > Auto-refund section > turn on Enable automatic refunds for cancelled bookings
2.4.3. Pending payment policy
This feature allows merchants to automatically cancel bookings that remain in a pending payment status for a specified period of time.
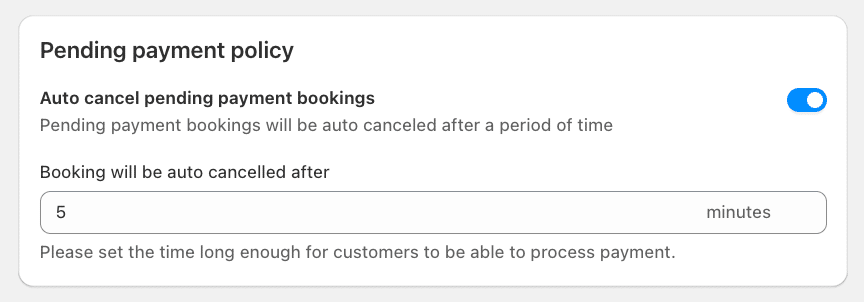
- Auto cancel pending payment bookings: Enable or disable the automatic cancellation of bookings with pending payments.
- Booking will be auto cancelled after: Set the amount of time a booking can remain pending before it is automatically cancelled. Merchants should set a sufficient time period to give customers enough time to complete the payment process.
Example: If the value is set to 5 minutes, any booking that remains unpaid will be automatically cancelled after 5 minutes
Purpose: This feature helps prevent unpaid/pending bookings from unnecessarily occupying available booking slots or capacity.
2.4.4. Deposit payment
Meety’s Deposit Payment feature allows you to require customers to pay a portion upfront and the rest later.
This feature helps reduce cancellations and no-shows, ensuring a smoother booking experience for everyone.
Some examples of deposit payments are:
- Require a 15% deposit for booking a package of fitness classes
- Require a $20 deposit for private consulting sessions
- Require a 30% deposit for booking a wedding venue
Here’s a closer look at how Deposit Payment works:
a. How to set up Deposit Payment?
- To create a Deposit Payment: go to Services tab > click Manage services > choose Payment/Pricing > Deposit Payment section
- Turn on Allow customers split their payment in two
- Choose payment type: Select either Percent or Fixed Amount
- Enter the Deposit amount: Specify the deposit amount as a percentage (%) or a currency value ($)
- Deposit Label: Enter a name for the deposit that will be shown to the customer
- Enable full payment option:
- If turn off: Customers can only pay the deposit amount
- If turn on: Customers can choose between full payment or deposit payment
- Automatically charge remaining amount: Set a time for the app to automatically charge the remaining balance of a service after the initial payment is made or before the booking starts.
b. How to manage Deposit bookings?
- To manage your Deposit bookings: go to Booking tab > choose Deposit
- All deposit bookings will be displayed here. You can click on each booking to view and edit the details:

- Manage payment options:
- Charge remaining amount: Click this option to immediately request to charge customer the remaining amount of the bookings
- Send invoice: Click this option to send invoice of the booking to customer’s email
- Payment status of deposit booking: Each deposit booking has 5 payment status types that correspond with Shopify orders:
- Unpaid: The booking has not been paid
- Pending Payment: When the customer is requested to paid but hasn’t paid yet
- Partially Paid: The booking is partially paid with the deposit amount
- Paid: The booking is fully paid
- Failed Payment: The customer failed to make the payment
c. What does a Deposit Payment look like for Customers?
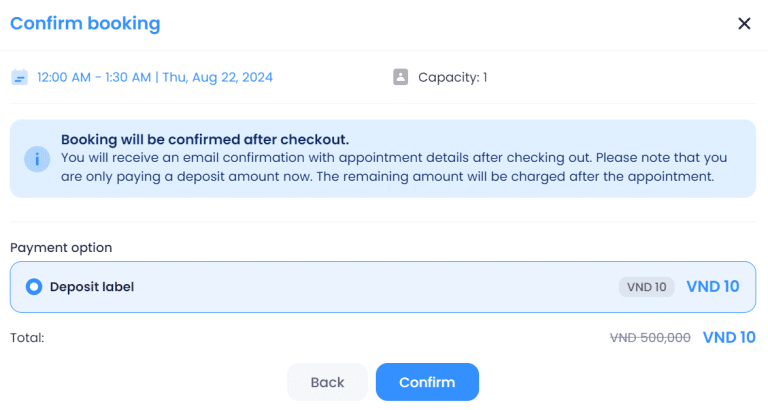
- When you enable the Deposit Payment for your services, customers will see your services as usual. Additionally, in the confirmation window, customers will have the option to pay the deposit amount
- Please note that on the checkout window, the full price of the service will be displayed
2.4.5. Seasonal pricing
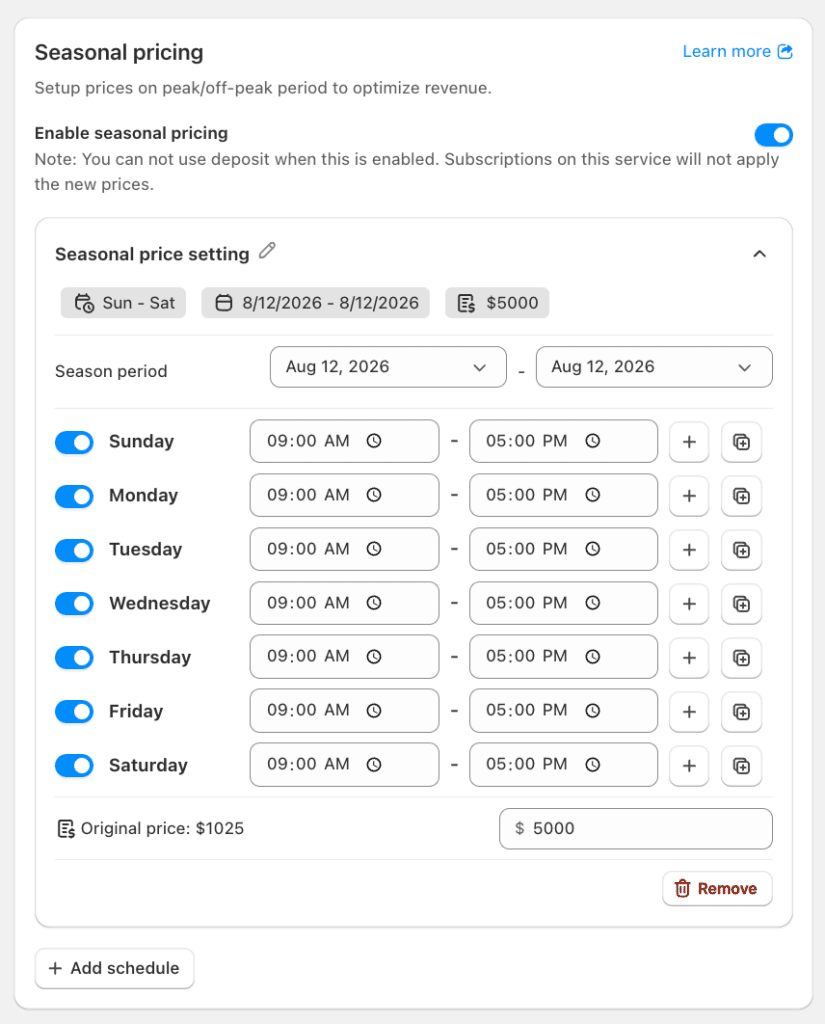
Meety’s Seasonal pricing feature allows you to set different prices based on peak and off-peak periods. This feature helps you optimize revenue by increasing prices during high-demand times, such as holidays or busy seasons, and offering lower prices during slower periods to attract more customers and boost sales.
Upgrade to Meety Premium plan today to unlock this flexible pricing feature.
Please note:
- When Seasonal pricing is enabled, Deposit and Subscriptions features cannot be used
- For Subscriptions, the booking page will still display the subscription price. However, at checkout, the Seasonal pricing will override and be applied if it’s currently active
Some examples of how this can be applied:
- Spa Services: Increase prices on weekends or holidays when demand is high
- Workshops or Events: Offer lower prices on weekdays to encourage more sign-ups
- Fitness Classes: Charge higher rates during peak evening slots and lower during midday
a. How to set up Seasonal Pricing?
Go to Services tab > click Manage service button > Payment/ Pricing > Seasonal pricing section > turn on Enable Seasonal pricing
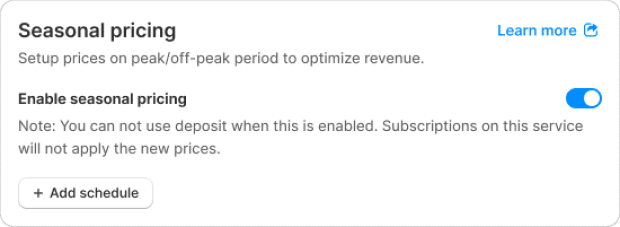
Add schedule: Click to create one or more pricing rules that define when and how your seasonal pricing will be applied – including season period, specific days of the week, time slots, and custom prices.
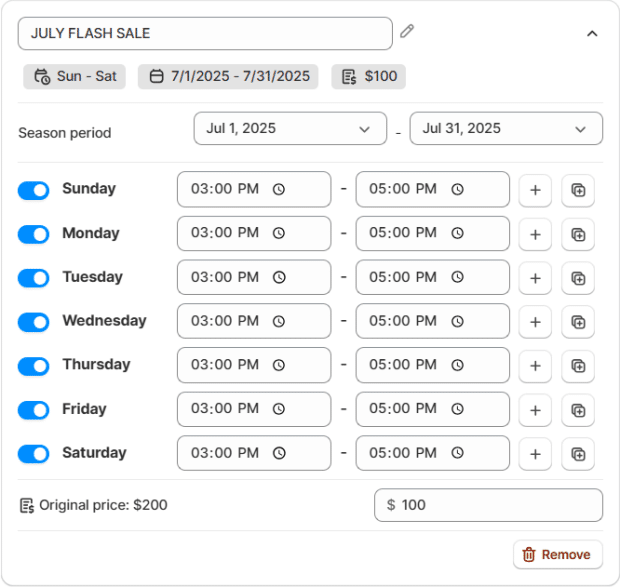
- For each schedule, set:
- Title of campaign (e.g. JULY FLASH SALE)
- Season period: Define the active date range for the seasonal pricing (e.g. Jul 1, 2025 – Jul 31, 2025)
- Days of the week & time range: Specify which days and time slots the pricing should apply (e.g. every day from 3 PM to 6 PM)
- Price per unit: Set your custom rate during the selected period (e.g. reduced from $200 to $100)
You can add multiple schedules to tailor pricing for different seasons, holidays, or times of day by clicking Add schedule.

b. What does Seasonal pricing look like for Customers?
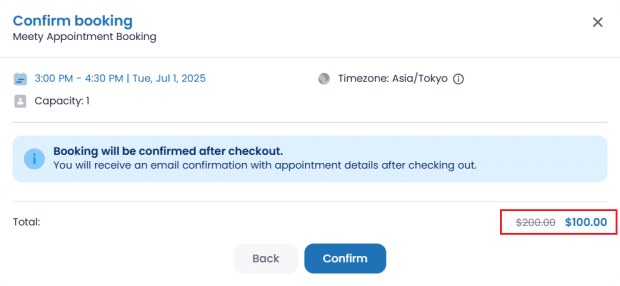
When booking a service, customers will automatically see the adjusted price that applies to their selected time slot. No extra steps are needed – they’ll always see the correct price based on your seasonal pricing settings.
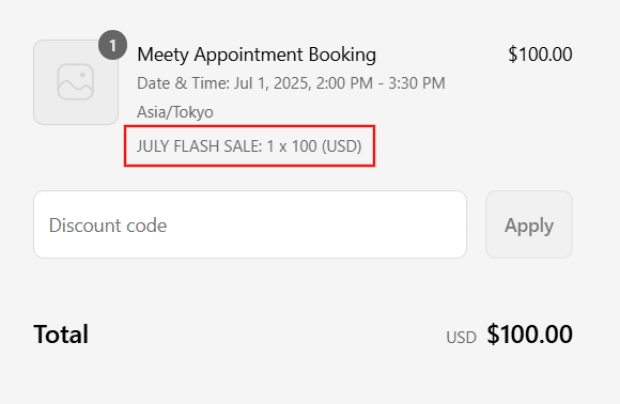
At the checkout step, the title of the campaign will also appear on the screen to let customers know that a seasonal price is being applied.
Let Seasonal Pricing work for your business all year round. Adjust prices smartly and boost revenue with just a few clicks.
2.5. Advanced
2.5.1. Booking slot secure
Set a time period for the app to temporarily reserve a time slot when a customer selects it, preventing double bookings. This feature is available in the Starter plan
Meety’s Booking Slot Secure feature helps prevent double bookings by temporarily holding a time slot when a customer selects it. This ensures that the slot remains reserved for them while they complete their booking, making the process smoother and more reliable.
This feature is especially useful in high-demand services where time slots can fill up quickly, ensuring a smooth and fair booking experience for all customers.
Some examples of how this can be applied:
- Hair Salon: A client’s time slot is reserved for 5 minutes while they book.
- Event Tickets: A ticket is held for 10 minutes during checkout.
- Doctor’s Office: An appointment slot is held for 15 minutes to complete the booking.
Here’s a closer look at how Booking slot secure works:
a. How to use the Booking slot secure feature?

To set up Booking slot secure:
- Go to Services tab > click Manage service button > Advanced > find Booking slot secure section > click Enable
- Enter the number of seconds you want the slot to be reserved for the customer
- Auto-cancel double booking: If a customer does not complete checkout within the slot security timeout period, duplicate bookings may occasionally occur. The system will automatically cancel any duplicate bookings to preserve availability
b. What does a Booking slot secure feature look like for Customers?
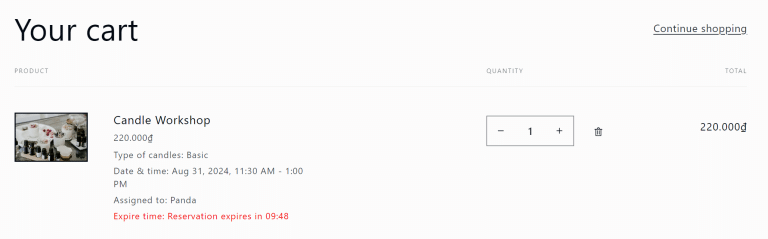
Once customers add a booking to their cart, they’ll see a notification indicating, “Reservation expires in [time]” based on the time you’ve set. This shows how long the slot will be held for them before it’s released.
2.5.2. Add-on product
Meety’s Add-On Product feature lets you offer extra services and upgrades directly from your Shopify product catalog. Now, in addition to adding premium options like equipment rentals or personalized treatments, you can also extend the duration of the main service with specific add-ons.
Please note: Add-On Product can only use Shopify products and cannot include other Meety services.
This is different from Upsell Service, which used to upsell other services created in Meety instead. You can refer to the Upsell service tutorial.
Some examples of how this can be applied:
- Spa Appointments: Offer a 30-minute hot stone massage add-on to extend a standard 60-minute body massage to 90 minutes.
- Tarot Reading: Offer add-ons such as a crystal reading or a personalized report alongside a tarot session.
- Fitness Classes: Include options such as workout gear rental or additional personal training sessions.
Here’s a closer look at how Add-on product works:
a. How to set up the Add-on product?
To set up the Add-on product:
- Go to Services tab > click Manage service button > Advanced > Add-on product section > turn on Enable add-on product
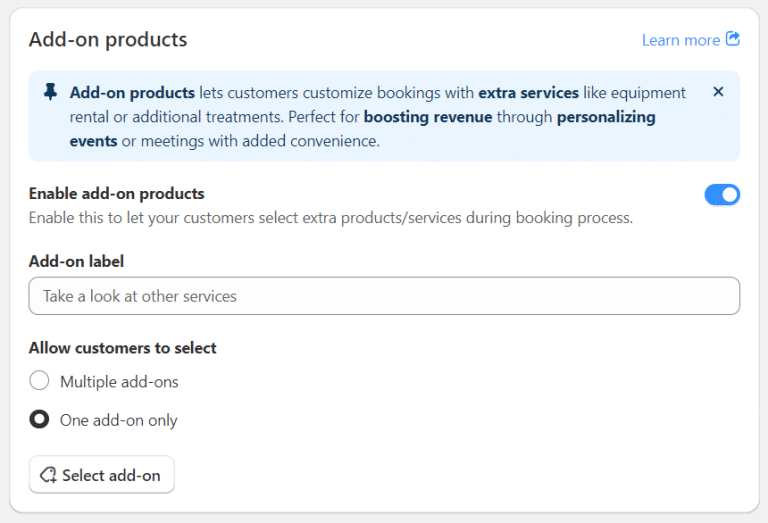
- Add-on label: Enter the label you want customers to see on the Add-on product section of the calendar widget
- Allow customers to select: Choose whether customers can select multiple add-ons or only one per service
- Select add-on: Click to choose the products you want to offer as add-ons
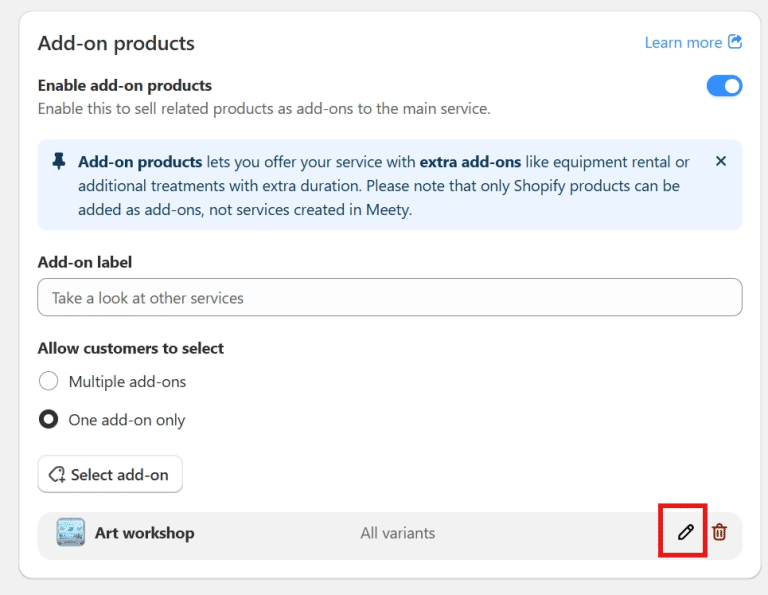
- Edit add-on:
- Description: enter a description for the add-on product
- Quantity settings: Define the minimum and maximum quantity of each add-on
- Discounts: Set a discount for the add-on if applicable
- Duration: Specify the additional time the add-on will add to the main service

Note: You can only add products from your Shopify store that are NOT already added to Meety as a service
Tips: If you want to include an existing Meety service as an add-on, follow these steps:
Create a new Shopify product with the same name as the Meety service
Do not add this new product to Meety as a service
Add the newly created product to the Add-On Service feature
This ensures the service can be offered as an add-on while keeping your main service setup intact.
b. What does an Add-on service look like for Customers?
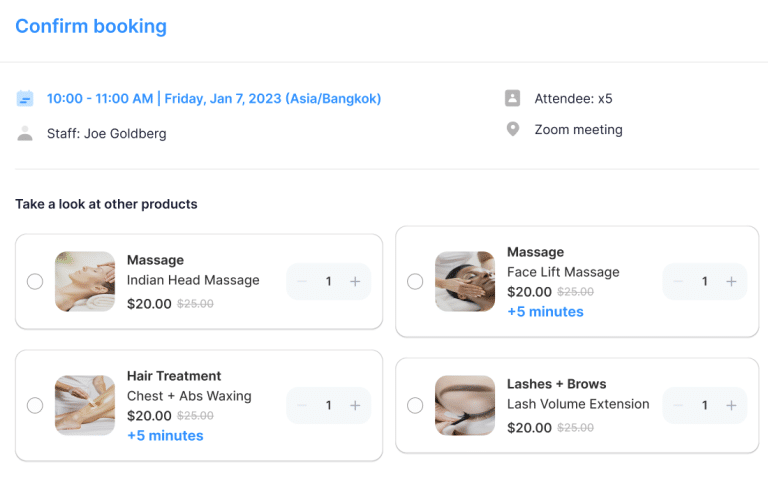
After customers click “Schedule Your Time” button and select a time/day slot, the Confirm Booking window will display the add-on product section
Customers can choose the add-on product(s) and select the quantity they want
The add-on extra duration will be automatically added to the main service
Once selected, they proceed to checkout as usual
2.5.3. Upsell
Meety’s Upsell Service feature allows you to suggest additional services to customers after they confirm their booking. This feature helps maximize sales opportunities by encouraging customers to explore and book more services.
Please note: Only services created in Meety with Active status can be added as upsell options.
This is different from Add-On Products, which use Shopify products instead. You can refer to the Add-on tutorial.
Some examples of how this can be applied:
- Spa Appointments: Offer an additional facial treatment after booking a massage.
- Tarot Reading: Suggest an extended in-depth reading or a personalized report.
- Fitness Classes: Recommend a one-on-one personal training session after booking a group class.
Here’s a closer look at how Upsell service works:
a. How to set up the Upsell service?
To set up the Upsell service:
- Go to Services tab > click Manage service button > Advanced > Upsell service section > turn on Enable upsell services
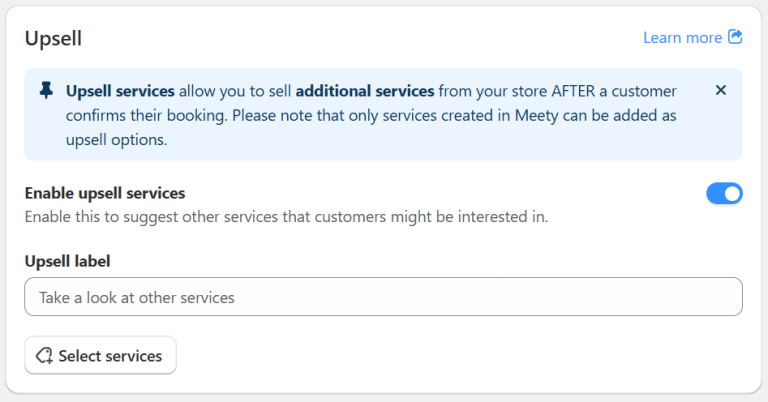
- Upsell label: Enter the label you want customers to see on the Upsell service section of the calendar widget
- Select service: Click to choose which services you want to suggest as upsells
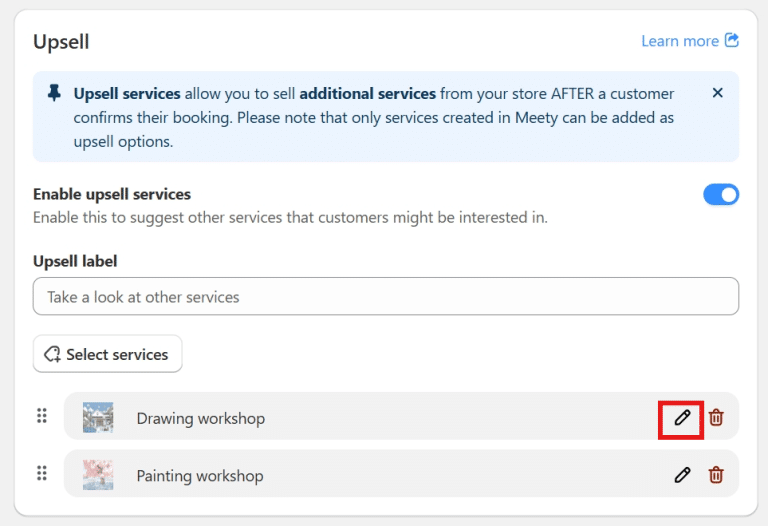
Edit upsell service: Click the Edit icon to modify the short description and make the upsell more appealing

b. What does Upsell service look like for Customers?
- After customers click the Schedule Your Time button, select a time slot, and confirm their booking, the Upsell Service section will appear.
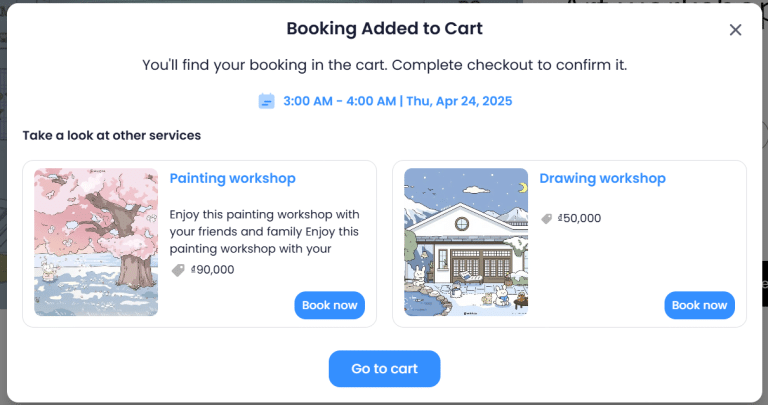
- Customers will have the option to:
- Proceed to Checkout with their confirmed booking.
- Explore More Services and add an upsell service before checkout.
2.5.4. Total booking limitation
Meety’s Total booking limits feature allows you to manage and limit the number of bookings you can accept for a single service within a specified period.
If you want to limit the number of bookings for the whole store, visit Store Capacity to learn more.
This feature ensures you avoid overbooking and gives you the flexibility to offer multiple time slots while maintaining quality service.
Some examples of how this can be applied:
- Fitness Instructor: Offers multiple class times daily but can only take 5 sessions per day
- Chef: Provides cooking services for breakfast, lunch, and dinner but can only take 1 booking per day
- Baking Workshop: Available all week but only has ingredients to serve 10 attendees per week
Here’s a closer look at how Total booking limits works:
a. How does Total booking limit work?
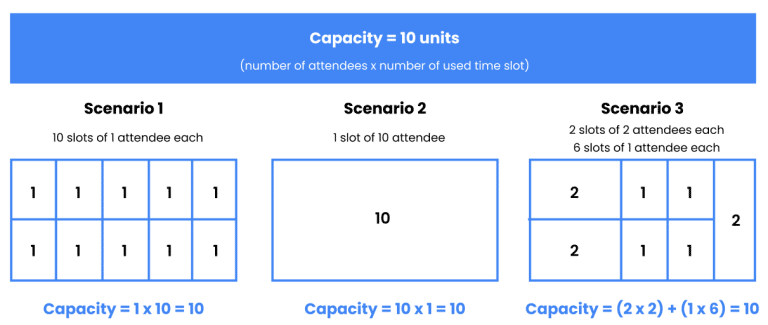
Total booking limit is the limit units you set for your service. It is calculated by multiplying the number of attendees by the used time slots.
Total booking limit units = Number of attendees * Used time slots
You can set a limit for every day(s), week(s), or any other time frame you prefer.
Example: Let’s say you set a capacity of 10 units per week. This means you could have:
- 10 slots of 1 attendee each
- 2 slots of 5 attendees each
- 1 slot of 10 attendees
Here’s an illustrated example for better clarity:
b. How to set up the Total booking limit?
To set up the Service Capacity:
- Go to Service tab > click Edit service button > Advanced > Total Booking Limitations section > turn on Enable total booking limitation
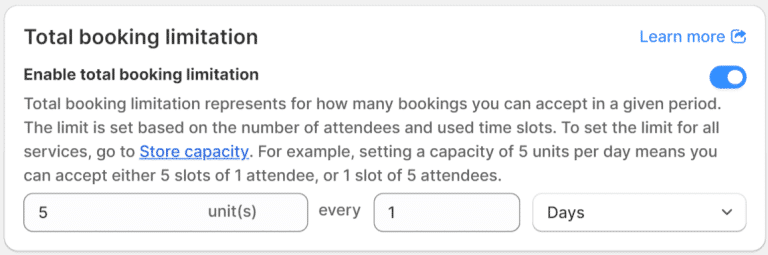
- Enter the desired number of units you want to allow
- Choose the time period (e.g., every 1 day, every 2 weeks).
- Save your settings
c. Why use the Total booking limit?
- Prevent overbooking: Set limits to ensure you don’t take on more bookings than you can handle
- Flexible scheduling: Offer multiple time slots while managing your overall capacity
- Maintain quality: Ensure each booking receives the attention and resources it needs
2.5.5. Customer portal
Meety’s Customer Portal feature allows your customers to view, reschedule, or cancel their bookings directly from their side. This empowers your customers with flexibility while reducing your administrative workload, ensuring a seamless booking experience.
Here’s a closer look at how Customer Portal works:
a. How to enable Customer Portal for your customers?
To set up the Customer Portal:
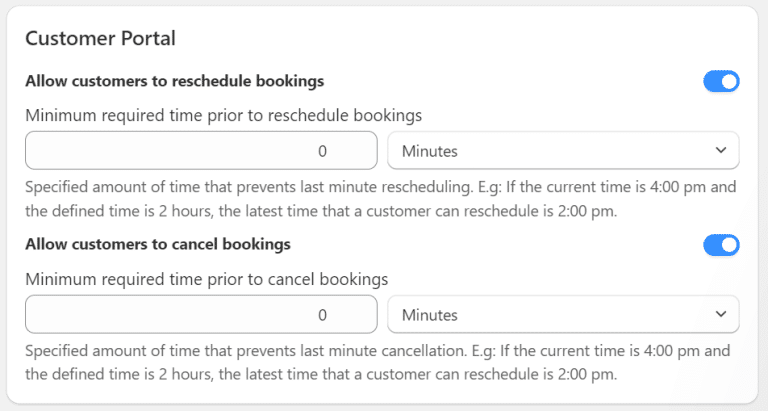
- Go to Services tab > click Manage service button > Advanced > Customer Portal section
- Turn on one or both of the following options:
- Allow customers to reschedule bookings
- Allow customers to cancel bookings
- You can also set up the Minimum required time prior to rescheduling or cancelling bookings for customers
When enabled, the link to the Customer Portal will be automatically included in the confirmation email sent to customers. They can use this link to reschedule or cancel their bookings.
b. How does Customer Portal work for your customers?
Scenario 1: Customers with an account on your website
- If a customer has already created a customer account and is logged in, they can access the Customer Portal seamlessly
- After booking, they’ll receive a confirmation email containing the Customer Portal link
- Clicking the link will open the Manage Booking page in their Customer Portal, where they can view all their bookings and manage them
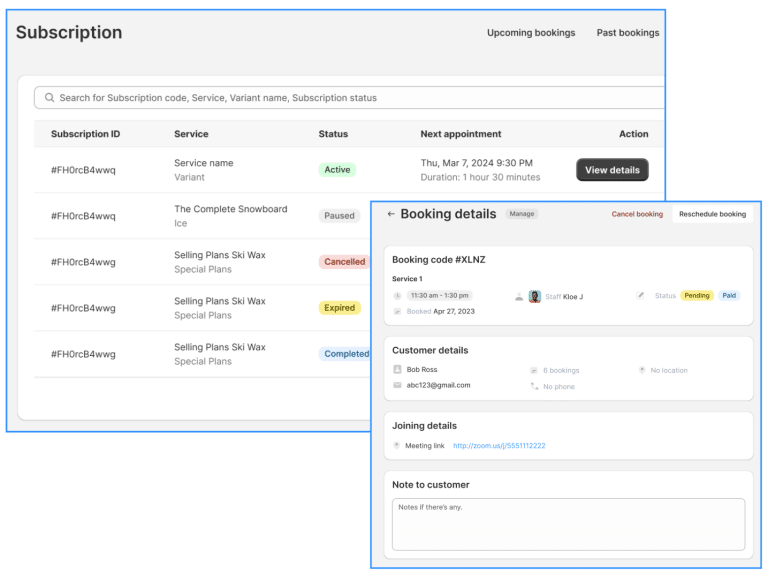
Scenario 2: Customers without an account on your website
- Customers who haven’t created an account will also receive a Customer Portal link in their confirmation email
- Clicking the link will direct them to a page where they can enter their booking code and email used for the booking

- Once authenticated, they can view and manage only that specific booking
Scenario 3: If you are using the New Customer Accounts
- If in Shopify Admin > Settings > Customer Accounts, you are using the new customer account feature instead of the classic account, accessing the Customer Portal might require additional steps
- However, we recommend using the classic account for the best compatibility with Meety’s features, including the Customer Portal
- If you need assistance, please contact our live support team. Our agents will guide you through the process and ensure everything works smoothly
c. How to allow customers to Reschedule/Cancel directly from emails?
Previously, customers had to access the Customer Portal to reschedule or cancel a booking. Now, they can do so directly from their confirmation email or any other email notification by clicking a link.
To enable this feature:
- Go to Settings > Notifications > click Edit on the email template you want to update
- Enter the text for the hyperlink (e.g., “Click here to Reschedule your booking”

- Scroll down to the Email Variables section
- Find and copy the parameter:
- [Reschedule booking] for rescheduling
- [Cancel booking] for cancellations
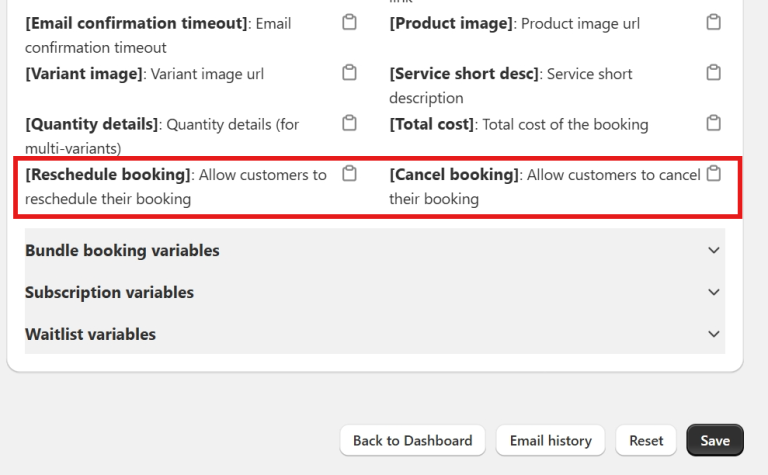
- Go back to the email editor > highlight the text you want to hyperlink
- Click the hyperlink icon and paste the copied parameter

Once set up, customers can click the link in their email to open a reschedule or cancel pop-up instantly—without needing to access the Customer Portal.
Tip: Add this link to any email templates where you want to offer easy rescheduling or cancellation!
2.5.6. Booking approval
Meety allows you to either automatically approve incoming bookings or require manual approval before confirming them.
Here’s a closer look at how Booking approval works:
a. How to set up booking approval?
To set up Booking approval feature:
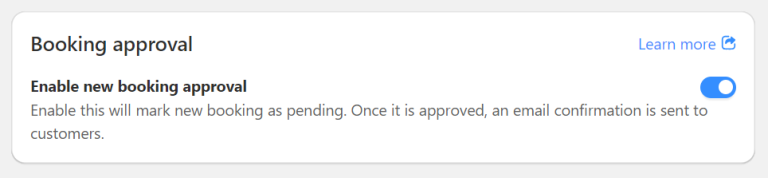
- Go to Services tab > click Manage service button > Advanced > Booking approval section > turn on Enable new booking approval
- If turned on: New bookings are marked as Pending until you manually Approve or Reject them. You will also receive an email to remind you to approve the bookings
- If turned off: New bookings are automatically approved and confirmed instantly, with no manual review needed
Note:
The booking slot will remain available until the status is updated
Customers will still need to pay for the pending bookings. If the booking is rejected, merchants will need to handle refunds manually or use the Auto-refund feature (available in Business plan)
b. Managing booking approval status
To manage Booking approval status:
- Go to Booking tab > Status column
- For Pending bookings, you can Approve or Reject each one by clicking on the status and change it
- Customers will receive a notification once their booking is approved or rejected
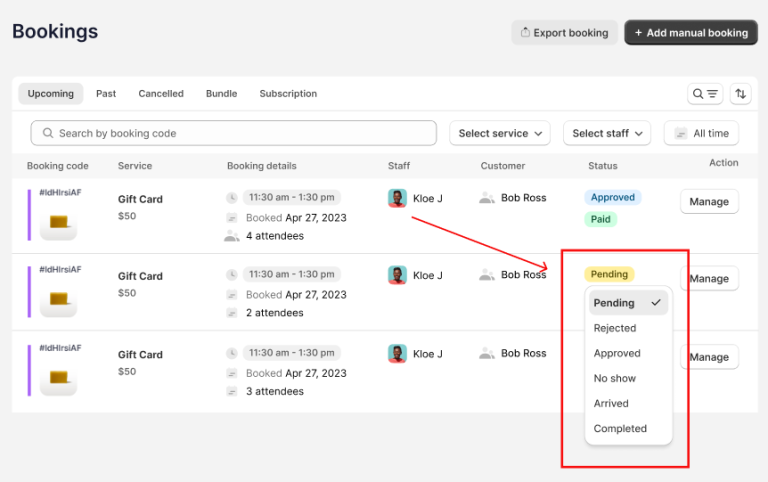
After a booking is approved (either automatically or manually), you can update the status as:
- No Show: If the customer did not show up
- Arrived: Once the customer arrives for the booking
- Completed: When the booking is completed
Note:
- Once a booking status is set to Arrived, it cannot be reverted to No show, Approved, Rejected or Pending
- Once a booking status is set to Completed, it cannot be reverted to Arrived
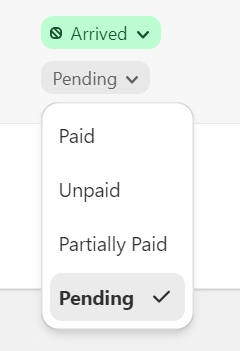
c. Managing Payment Status
You can also mark each booking as Paid, Unpaid, Partially Paid or Pending separately from the main status
2.5.7. Waitlist
Meety’s Waitlist feature allows customers to join a waitlist for fully booked services or time slots.
This ensures they are automatically notified when a new opening becomes available, providing a seamless booking experience for both you and your customers.
The Waitlist feature helps you optimize service availability and minimize missed opportunities.
Some examples of how this can be applied:
- Yoga Classes: Keep clients in the queue for last-minute openings of fully booked classes.
- Massage Center: Notify customers about openings for fully booked sessions.
- Wedding Venue: Inform potential clients when event dates become available.
Here’s a closer look at how Waitlist works:
a. How to set up the Waitlist?
First, to set up the Waitlist feature:
- Go to Services tab > click Manage service button > Advanced > Waitlist section > turn on Enable waitlist after slots are full
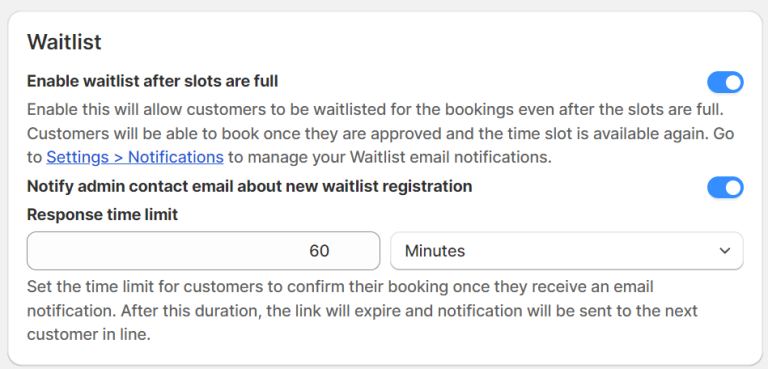
- You can set up the option to receive emails when a customer join your waitlist
- Enter the time limit you allow your customers to confirm their bookings
- The booking link will expire when time ends, and notification will be sent to the next person on the waitlist
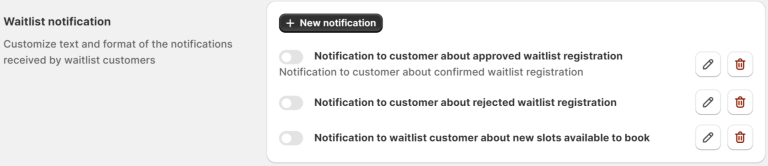
Second, to set up the Customer Waitlist email notifications:
- Go to Settings tab > Notifications > Waitlist notification section
- Here, you can turn on/off and edit the content of waitlist emails. Default content will be auto-generated
b. How to view and manage your Waitlist?
To view and manage the customers on Waitlist:
- Go to Bookings tab > choose Waitlist
- All customers who join the waitlist and their information will be shown as below:
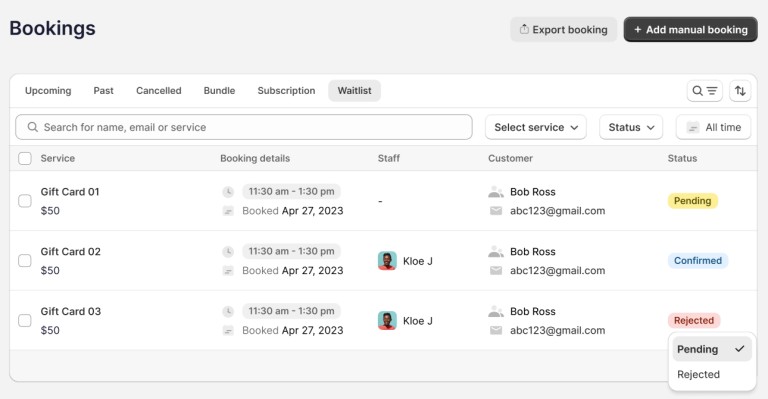
There are 4 statuses for each customer on the waitlist:
- Pending: This is the default status when a customer joins the waitlist
- Rejected: The status changes to “Rejected” if you choose to remove the customer from the waitlist
- Confirmed: The status changes to “Confirmed” once the customer successfully books the service
- Expired: The status changes to “Expired” if the customer doesn’t book their slot within the response time limit
c. How do your Customers join the Waitlist?
The “Join the waitlist” option will appear:
- If a time slot for a service is fully booked
- If the staff is fully booked (apply when you turn on “Allow customer to choose staff”)

Here is the Waitlist Process for a customer:
- Joining the Waitlist: Customers choose to join when the selected time slots are booked.
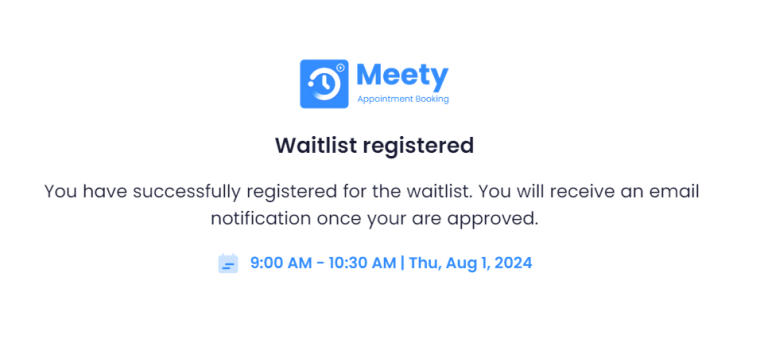
- Confirmation Email: Customers receive an automated email confirming they have joined the waitlist.
- Slot Becomes Available: An email with a booking link is sent to the customer on a First Come First Come basis, when a slot is available again.
- Accepting the Slot: If the customer confirms the booking through the booking link within the response time limit, they will be accepted for the service.
- Declining the Slot: If the customer doesn’t respond within the time limit, the link expires, and the booking link will be automatically sent to the next customer on the waitlist.
2.5.8. Advanced variants selection
Meety’s Advanced Variants Selection feature allows your customers to book a single time slot while selecting multiple variants and their quantities, all at once.
This improves the booking experience for services with different attendee types or multiple options in the same time slot, allowing customers to choose everything in one booking.
Some examples of how this can be applied:
- Event Concert: A family can easily book 2 Adult tickets and 2 Child tickets for the concert in one booking.
- Spa Appointments: A customer can select 1 massage, 1 facial, and 1 manicure during the same appointment.
- Cooking Classes: A couple can book a cooking class for themselves and their two kids by selecting 2 Adult spots and 2 Child spots for a single session.
- Here’s a closer look at how Advanced Variants Selection works:
a. How to set up Advanced Variants Selection?
To set up the Advanced Variants Selection:
- Go to Services tab > click Manage service button > Advanced > Advanced variants selection section > turn on Enable advanced variants selection
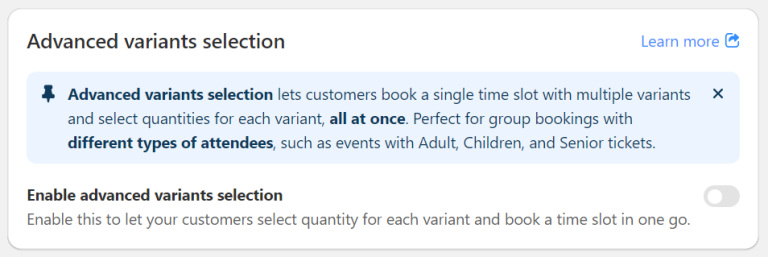
- Select the variants you want to allow for group booking. Variants not included will require separate bookings as usual
- Set up the minimum and maximum quantity of each variant

Notes:
The maximum quantity of all variants combined must be greater than the minimum number of attendees each booking
If you enable the Total Booking Limitation feature, the limit is set based on the number of variants and used time slots
b. What does Advanced Variants Selection look like for Customers?
After clicking “Schedule Your Time” customers will see options to select quantities for each variant in the calendar widget before booking their chosen time slot.
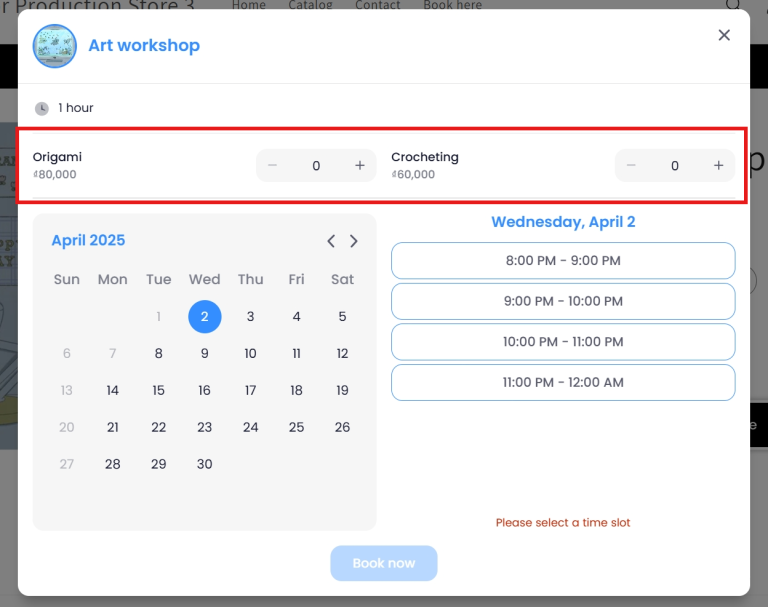
- At checkout, all options will be combined in the same order, and the customer will receive an email with details for all the variants
2.6. Notifications
Notifications for each service
With Meety’s Service Notifications, you can now customize notifications for each service individually. This allows you to tailor communication based on the specific needs of each service, enhancing customer engagement and clarity.
If you want to set up notifications for your whole store, go to Settings tab > Notifications.
Here’s a closer look at how Service Notifications works:
a. How to set up Notifications for each service?
To set up notifications for a specific service:
- Go to the Services tab > Click Manage Service button > Notifications
- You will find options to set up Email, SMS, and WhatsApp notifications
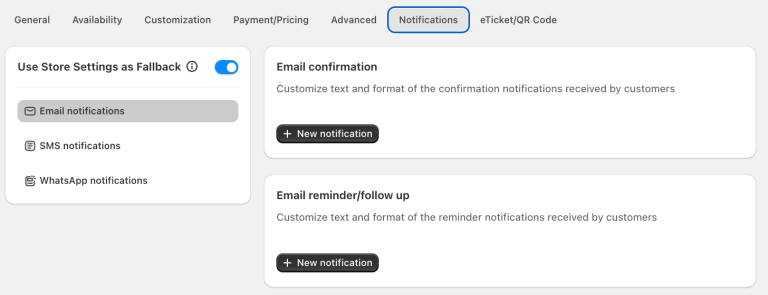
For detailed instructions on each type of notification, visit:
- Email notifications (available in Starter plan)
- SMS notifications (available in Business plan)
- WhatsApp notifications (available in Business plan)
Use Store Settings as Fallback:
This feature allows merchants to control whether notification settings configured at the service level should override or fall back to the store-level notification settings.
- Enabled: Service-level notification settings take priority. If a notification is not configured at the service level, the corresponding Store setting will be applied.
- Disabled: Store-level notification settings are ignored. Only notifications that are explicitly enabled for the service will be sent.
Note: You can still edit some email notifications for all services in the Settings tab if you are on the Free plan.
b. Important note on Service Notifications
When you enable Service Notifications for a service:
- Only the notifications set up on the Edit Service page will be sent for that service, overriding the general settings
- The email notifications you configure in the Service tab will not affect the email notifications you set up for the whole store in the Settings tab > Notifications
2.7. E – ticket/QR code
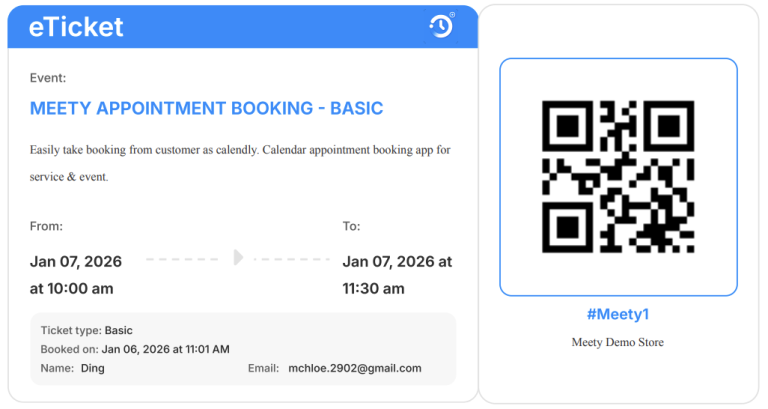
The eTicket/QR Code feature allows merchants to automatically generate a digital ticket for each booking. Each ticket contains a unique QR code that can be scanned at your POS to quickly retrieve booking details and check in attendees.
This makes on-site check-in faster, more accurate, and ideal for offline services, in-store appointments, and events.
2.7.1. Enabling the eTicket / QR Code feature
Go to Meety > Services > Click Manage the service > eTicket/QR Code tab > Enable Enable eTicket – delivered via email.
When you turn on Enable eTicket – delivered via email toggle, the detailed setup options will expand.
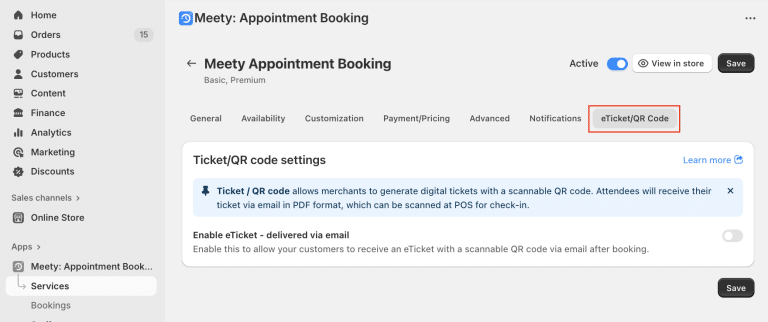
Note: The Ticket/QR Code feature can not be used together with Multiple booking.
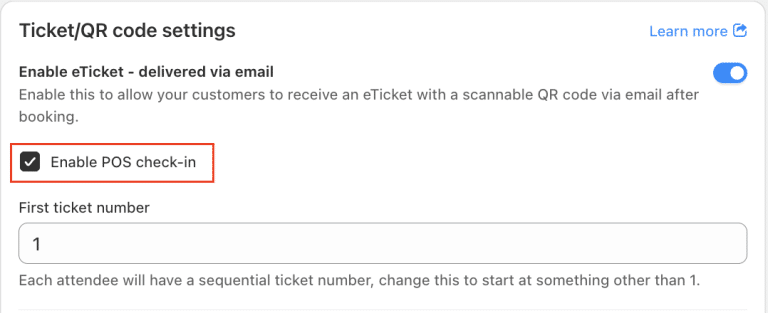
- Enabling POS Check-in (optional but recommended): allows you to scan QR codes quickly and check in attendees using Shopify POS.
- First ticket number: Choose the number your ticket sequence starts from. Tickets will be numbered consecutively from this point.

Ticket code template: The ticket code is the main and unique identifier for each attendee’s ticket. By default, it is created using the ticket number with a hash symbol (#) in front.
You can customize this by setting a ticket code template. This allows you to create a more branded or standardized format for your tickets.
Example: #Meety{{attendee.ticket_number}}
The generated ticket code will look like #Meety1, #Meety2, etc.

Additional ticket formats – PDF ticket: lets you customize how your eTickets are delivered and displayed.
- PDF ticket is not selected: QR code in email only
- PDF ticket is selected: Full eTicket PDF attachment in email.
Click Create new eTicket template to design your ticket layout, You can choose a format (Horizontal, Vertical, or Compact) and customize which information appears on the ticket. Use the:
- Pencil icon to edit ticket fields
- Eye icon to preview the ticket design
To display the event location on a ticket, we recommend adding location to the product description (up to 100 characters). This information will then appear as shown in the example below:

In addition, switch to HTML mode to customize the template – edit colors, add variables, and insert images.

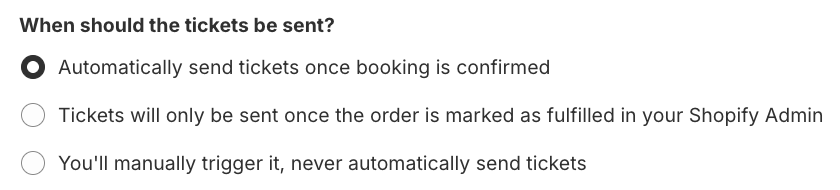
When should the tickets be sent?: Choose when tickets become valid. Before this point, QR codes cannot be used for check-in.

- After payment: Tickets are sent and activated as soon as the order is paid
- After fulfillment: Tickets are activated only when you mark the order as fulfilled in Shopify
- Manually: Tickets are sent and activated only when you trigger them yourself.
2.7.2. How customers receive eTicket
After booking and payment, your customers will receive an email containing their QR code eTicket (in PDF format or as a QR code only, depending on your settings).
When PDF format is enabled, the ticket is included as an embedded link in the email.
Customers can simply show the QR code on their phone at check-in.
2.7.3. Scanning QR code at check-in
When POS Check-in is enabled, you can:
- Open the Shopify POS app
- Use the camera to scan the QR code on the customer’s eTicket
- Verify booking details and complete check-in instantly

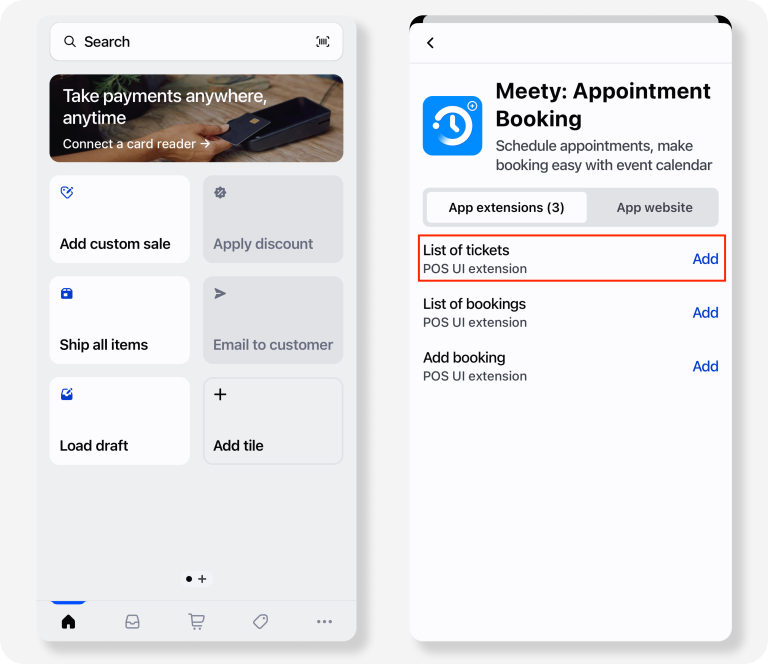
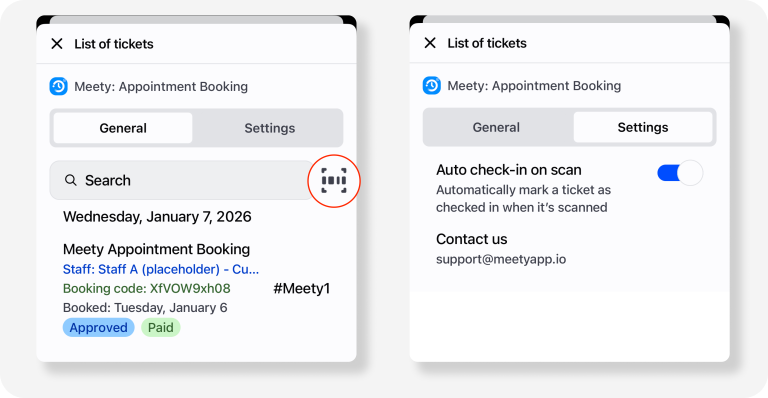
Open Shopify POS > Add tile > App > Meety: Appointment Booking > Add List of tickets > Save.
General
You can view the full list of tickets, sorted by time, and scan QR codes to check in attendees.
Settings
You can enable Auto check-in on scan to automatically mark tickets as checked in when they are scanned.
- When enabled, scanned tickets are instantly set to Checked-in.
- When disabled, scanning a ticket will show its details first, and you can manually click the Check-in button.

3. How to view and manage your Standard bookings?
To view and manage the Standard bookings on Booking list:
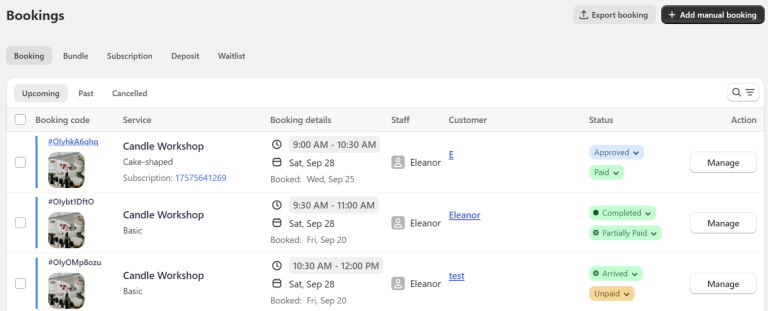
- Go to Bookings tab > choose Booking
- See detailed instructions on managing booking here
- All customers who book Standard booking will be shown as below, you can change status, view booking and customer details by clicking on Manage button:
4. What does Standard booking look like for customers?
Here is the customer’s process to book a Standard Booking:
- On product page, the Buy now button will turn into Schedule Your Time button
- Customers click on Schedule Your Time > a widget will pop up, displaying available time or day slots
- Customers select their preferred time or day slot and proceed to checkout through Shopify
- After checkout, they will receive a confirmation email from Meety and an invoice from Shopify

If you need help setting up your Standard Booking, our Customer Success team is here to assist. You can reach out to them through live chat, or by emailing support@meetyapp.io.
We’ll gladly provide tutorials, answer your questions, and ensure everything is set up properly.