The Notifications settings allow you to manage the different communication channels used to send booking-related notifications to customers and staff.
The available options include:
Email notifications
SMS notifications
WhatsApp notifications
1. Email notification
You can go to Meety > Settings > Notifications to configure the app’s email notifications and customize the email template.
Please note that default emails are sent from no-reply@meetyapp.io. Customers will not be able to reply to email notifications sent by Meety.
Your Company NameThe Email Notifications settings allow you to customize how booking-related emails are sent to customers, admins, and assigned staff. You can also configure a custom sender email and choose whether to include calendar invitations or ICS files in confirmation emails.
1.1. Set Up a Custom Sender Email
The Email sender verification section allows you to use your own email address as the sender for Meety email notifications.
Sender Name: enter the name that you want customers to see as the sender of your booking emails.
Example: Your Company Name
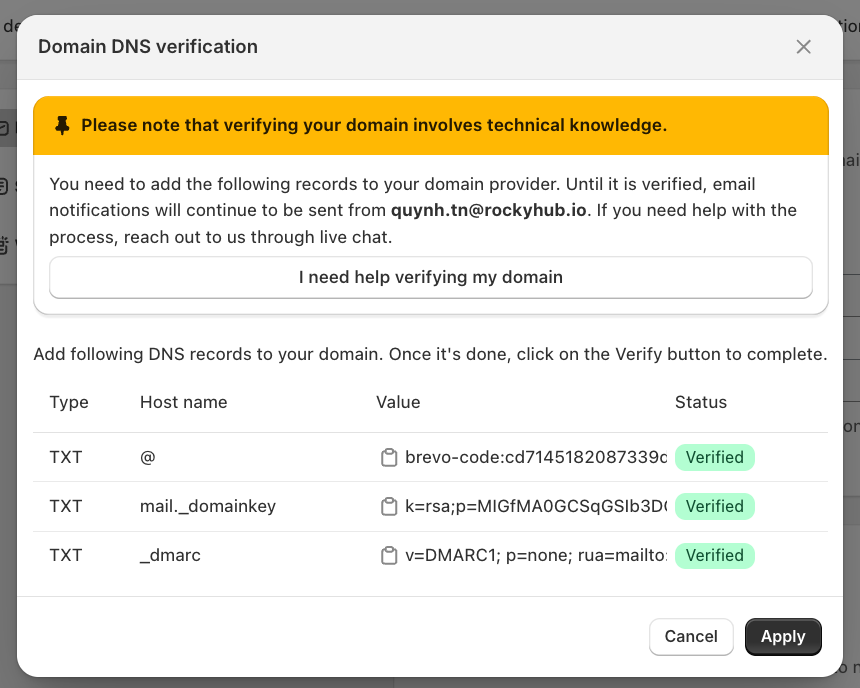
Sender Email: enter the email address you want to use for sending notifications and click Verify email button to open pop-up:
Once verified, the email address will be marked as Verified and can be used as the sender for your notifications.
Note: The sender email must be verified before it can be used for email notifications.
If you need help with verification, click See detail instructions.
1.2. Notification setting
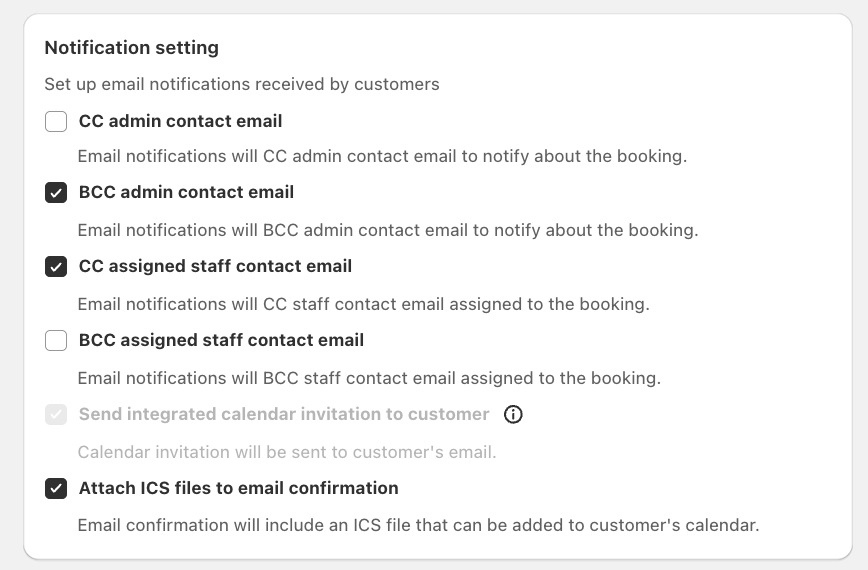
Under the Notification setting, you can choose which team members receive copies of booking-related email notifications.
CC Admin Contact Email: Enable CC admin contact email to send a copy of the notification to the admin contact email address.
BCC Admin Contact Email: Enable BCC admin contact email if you want to send a blind copy of the notification to the admin contact email address.
CC Assigned Staff Contact Email: Enable CC assigned staff contact email to send a copy of the notification to the staff member assigned to the booking.
BCC Assigned Staff Contact Email: Enable BCC assigned staff contact email to send a blind copy of the notification to the assigned staff member.
You can choose the CC or BCC option depending on whether you want the recipient’s email address to be visible to other recipients.
Send integrated calendar invitation to customer:allows a calendar invitation to be sent to the customer’s email address. This works only when the Google/Outlook calendar is connected.
Attach an ICS File to Confirmation Emails
Enable Attach ICS files to email confirmation to include an .ics calendar file in the booking confirmation email.
Customers can use the ICS file to add the appointment directly to their calendar application.
After configuring your email notification preferences, click Save in the top-right corner to apply the changes.
1.3. Email notifications
You can see all types of email notifications of your business, including 5 main specifications:
Email confirmation
Email reminder/follow-up
Email reschedule
Email cancellation
Email placeholders: Placeholders will be replaced with actual data when the email is generated and sent to the recipient. For example: [Store name] and [Service] represent your store name and service title.
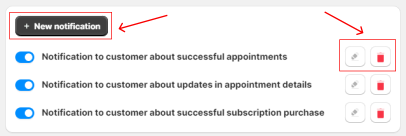
You can also take action on each of these notifications:
Click the New notification button to create a new email notification
Click the Toggle button to enable the notification
Click the Edit icon to edit the email template for each notification
Click the Remove icon to delete a notification (We recommend that instead of deleting a notification, you can choose to disable it instead)
To save all changes, click the Save button at the right bottom of the page. To reset all changes, click the Reset button.
After finishing all the settings, click Save.
To reset all settings back to default, click the Reset button.